
A while ago, I asked my subscribers what they want from this site, and the responses were contradictory. Some of you wanted basics and others wanted advanced techniques.
In this tutorial, I'll provide a basic tutorial of animation along with best practices that even advanced users should find valuable. Happily, animation in PowerPoint 2007 is the same as in 2002 and 2003, so the instructions apply to all of these versions.
You can follow along with this tutorial in your version of PowerPoint.
Why use animation?
Animation is valuable for these purposes:
- To show a process or change
- To focus the audience's attention on a specific section of the slide
- For entertainment
You should never use animation just because you can. It's annoying to the audience and distracts from you message.
Decide why you need animation
Decide which of the above reasons requires you to use animation. Knowing this will help you choose the animation effect that's appropriate for your situation.
Focus the audience's attention on a specific section of the slide
Placing a circle around a section of the slide calls attention to it. This works better than using a laser pointer; a laser pointer is hard to control and requires you to look at the slide while you're talking -- instead of at the audience.
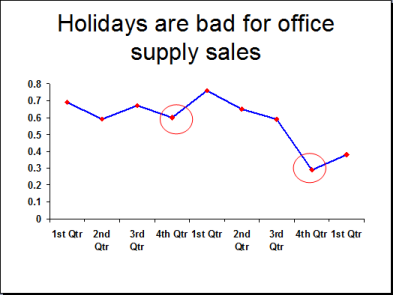
It's easy to make circles appear using animation.
- Draw the circles. Right-click and choose Format (Auto)Shape. Set the fill to No Fill and change the outline as desired.
- Select a circle and choose Slide Show> Custom Animation. (In 2007, go to Animations tab> Animations group> Custom Animation.) The Custom Animation task pane appears.
- Choose Add Effect> Entrance> (More Effects)> Appear. Leave the other settings at their defaults.
- Select the second circle and add the same animation to it.
- Press Ctrl and click the Slide Show button at the bottom of your screen (on the left for 2003, on the right for 2007). You'll see a quarter-size slide show view. Click twice to test the animation.
When you present, you can start discussing the chart and click when you get the point point where you want to emphasize the encircled section.
Create animation to show a process or change
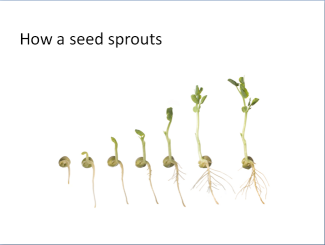
Let's say that you want to show the process of a seed sprouting. All you have is a series of images of different stages, so you can't show a continual change. In this situation, fading from one image to another will give the impression of continuous growth. This technique is fairly advanced.
- To start, open PowerPoint. Right-click and choose (Slide) Layout. Choose the Title Only layout. I changed the justification of the title, but that's not necessary.
- Enter the text for the title, in this case, How a seed sprouts.
- I found this image in Microsoft Office's clip art collection. To find it, choose Insert Clip Art on the Drawing toolbar. (In 2007, go to Insert tab> Illustrations group> Clip Art.
- In the Clip Art task pane on the right, enter seedlings in the Search For text box. The Search In drop-down list should read All Collections. From the Results Should Be drop-down list, choose Photographs and make sure that the other check boxes are not checked. Click Go. Click the image below to insert it on your slide.
A Fade transition from slide to slide exists but it isn't very subtle and you can't control the timing. Therefore, you should create this animation all on one slide.
- This image has a white background which will make your work easier if it's transparent. Select it and choose Set Transparent Color on the Picture toolbar that appears. Click the white background.
- You need 7 copies of the image, each cropped to one of the stages. Then we'll add the fade effect. To start, select the image, and press Ctrl + D. Press the right arrow key a couple of times until you can see the old and new images separately. You'll notice that the copy is lower than the original. Use the up arrow twice to bring the copy up to the same level as the original.
- Now press Ctrl + D 5 more times to make 7 images. You'll notice that PowerPoint remembered the spacing between the first copy and the original and continues the pattern, so that the images are now all lined up.

- Select the rightmost copy. The Picture toolbar appears. (In 2007, go to Format tab> Size group>Crop button.) Click the Crop button and drag on the left crop handle until you see only the rightmost stage. Click on the second-to-right image, and crop both on the right and the left so that you have the second-to-last stage. Continue until you have 7 images, each showing one stage. If you make a mistake, you can always undo cropping and try again. Also, the images overlap slightly; just do the best you can. If necessary, move some of the images a little to the left or right (with the arrow keys) to separate them. Be sure to save your presentation now and regularly as you go on.
It's hard to animate many objects when they're on top of each other, so we'll animate them as is and place them on top of each other at the end. The result will be like a stop-motion movie. As each stage fades out, the next will fade in.
- The first stage will appear on the slide at the beginning, so we just need to fade it out. Select it, and choose Slide Show> Custom Animation. (In 2007, go to Animations tab> Animations group> Custom Animation.) The Custom Animation task pane appears.
- Choose Add Effect> Exit> (More Effects)> Fade. Leave the default Start setting as On Click. We'll start the sequence by clicking, but the rest will happen automatically.
- Select the second stage. This will fade in as the first stage fades out. Choose Add Effect> Entrance> (More Effects)> Fade. Set the Start setting to With Previous.
- With the second stage still selected, choose Add Effect> Exit> Fade. Set the Start setting to After Previous.
- Repeat the last two steps for the 3rd through 6th stages. Be sure to set each exit to After Previous and each entrance to With Previous.
- The last stage will remain on the slide, so just add an entrance fade and set it to With Previous.
- Click the Play button on the Custom Animation task pane and view the animation. Each stage should successively fade in while the previous stage is fading out. If you think the effect is too slow, you can change the speed of all the animations to Fast. Just select the first animation, press Shift, select the last animation, and choose Fast from the Speed drop-down list.
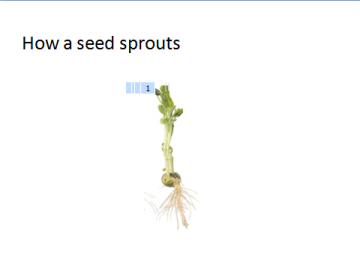
- Use the left arrow key to move the 2nd stage on top of the 1st stage as exactly as possible. Continue with the rest of the images until they're all in one place.
Here's the result.
We'll discuss using animation for its entertainment value in a future tip.
Very interesting post, that was written in a nice way. Also, visit http://www.poweredtemplate.com/ if your're looking for a good PowerPoint template!
ReplyDelete