Banner
Showing posts with label powerpoint 2007. Show all posts

Tuesday, November 30, 2010

How to Extract Background Music from PowerPoint Presentation?

It happens often that you find a piece of wonderful background music from PowerPoint presentation and you want to extract the music out to play with your iPod, iPhone, or iPad, but you don't know what to do.
This tutorial will teach you how to extract an audio file from PowerPoint 2003, 2007 and 2010:

Please choose the PowerPoint version you are using below:
PowerPoint 2003 PowerPoint 2007 PowerPoint 2010

Extract Inserted Background Music with PowerPoint 2003:
Step 1: Open the presentation (.ppt), slideshow (.pps) or template (.pot) with the background music you want.
Step 2: Click “File”—“Save as Web Page”:


Step 3: In the pop-up window, select “Web Page (*.htm; *.html)” of the drop-down menu after “Save as type” and click “Save”.


Step 4: A folder named “filename_files” and a filename.html file will be output, open the folder, you will find all the audio files inserted into the PowerPoint presentation.


Extract Inserted Background Music with PowerPoint 2007:

Method A:
Step 1: Open the presentation (.ppt & .pptx), slideshow (.pps & .ppsx) or template (.pot & .potx) with the background music you want.

Step 2: Click the Office button at the top-left corner, and then select “Save As”—“Other Formats”.


Step 3: In the pop-up window, select “Web Page (*.htm; *.html)” of the drop-down menu after “Save as type” and click “Save”.


Step 4: A folder named “filename_files” and a filename.html file will be output, open the folder, you will find all the sound files inserted into the PowerPoint presentation.

Method B: (This method works for all PowerPoint 2007 & PowerPoint 2010 including .pptx, .ppsx, .potx, etc.)

Step 1: Make sure all files in your PC display file extension names (as filename.pptx, filename.exe, etc.). If not, enable them:

  1. Go into Windows Explorer

    If you don't have a toolbar or shortcut (usually a file folder with a magnifying glass superimposed over it) to get there, you can:
    1. Go to the Start menu
    2. Select Run
    3. Type "explorer.exe" in the box
    4. Hit the Enter key

  2. In Windows Explorer, choose Folder Options from the Tools menu
  3. Click on the View tab
  4. Find "Hide File Extensions for Known File Types" and UNcheck its box.
Step 2: Highlight the PowerPoint file, click “F2” and change the name of the presentation by adding a .zip to the end. (e.g. filename.pptx.zip).

Step 3: Click “Yes” if the following dialog box appears after changing the name.

Step 4: Unzip the file and open it. You can find a “ppt” folder in it. Open the “media” folder in “ppt” folder, you will find all the audio files inserted into PowerPoint presentation.


Extract Inserted Background Music with PowerPoint 2010:

Method A:

Metioned above.

Method B:
PowerPoint 2010 offers new support for viewing presentations directly within web browsers. This helps provide a consistent experience for viewing presentations and enables the display of features such as animations and transitions.

You can save presentations as an .htm file or as a .mht file through the PowerPoint object model. This provides compatibility with older add-ins and macros.

To save a file as a webpage (*.htm;*.html) to the desktop by using the ppSaveAsHTML argument for the *.htm file format, without embedding true type fonts (msoFalse), follow these steps:

Step 1: Open the PowerPoint presentation in PowerPoint 2010.
Step 2: Press "Alt"+ "F11" on your keyboard and Microsoft Visual Basic for Applications opens.

Step 3: Press "Ctrl"+"G" on your keyboard and the Immediate window opens within Microsoft VBA.
Step 4: Copy and paste the following text into the Immediate window:
ActivePresentation.SaveAs ":\users\\desktop\.htm", ppSaveAsHTML, msoFalse

Step 5: Press "Enter" on your keyboard.
In PowerPoint, where your presentation once had the filename you had given it, it now says .htm (upon saving the presentation the title bar will revert back to its original name).
Step 6: Navigate to where your PowerPoint presentation is saved. There is now a folder with the same name as your presentation followed by _files. (Example: HTMLme_files)
Step 7: Open the new folder. Included inside the folder are all of the audio files used in the presentation.

How to Extract Inserted Images from PowerPoint Presentation?

Have you ever met such a problem:
You have found a nice picture in a PowerPoint, and you want to extract it out to use in another presentation or set as your PC’s wallpaper, but you have no idea what to do.
This tutorial will help you to solve this problem easily.

Please choose the PowerPoint version you are using below:
PowerPoint 2003 PowerPoint 2007 PowerPoint 2010

Extract Inserted Images with PowerPoint 2003:
Step 1: Open the presentation (.ppt), slideshow (.pps) or template (.pot) with the images you want.
Step 2: Click “File”—“Save as Web Page”:


Step 3: In the pop-up window, select “Web Page (*.htm; *.html)” of the drop-down menu after “Save as type” and click “Save”.


Step 4: A folder named “filename_files” and a filename.html file will be output, open the folder, you will find all the images inserted into the PowerPoint presentation.


Extract Inserted Images with PowerPoint 2007:

Method A:
Step 1: Open the presentation (.ppt & .pptx), slideshow (.pps & .ppsx) or template (.pot & .potx) with the images you want.

Step 2: Click the Office button at the top-left corner, and then select “Save As”—“Other Formats”.


Step 3: In the pop-up window, select “Web Page (*.htm; *.html)” of the drop-down menu after “Save as type” and click “Save”.

Step 4: A folder named “filename_files” and a filename.html file will be output, open the folder, you will find all the images inserted into the PowerPoint presentation.

Method B: (This method works for all PowerPoint 2007 & PowerPoint 2010 including .pptx, .ppsx, .potx, etc.)

Step 1: Make sure all files in your PC display file extension names (as filename.pptx, filename.exe, etc.). If not, enable them:

  1. Go into Windows Explorer

    If you don't have a toolbar or shortcut (usually a file folder with a magnifying glass superimposed over it) to get there, you can:
    1. Go to the Start menu
    2. Select Run
    3. Type "explorer.exe" in the box
    4. Hit the Enter key

  2. In Windows Explorer, choose Folder Options from the Tools menu
  3. Click on the View tab
  4. Find "Hide File Extensions for Known File Types" and UNcheck its box.

Step 2: Highlight the PowerPoint file, click “F2” (or right click and select "Rename") and change the name of the presentation by adding a .zip to the end. (e.g. filename.pptx.zip).

Step 3: Click “Yes” if the following dialog box appears after changing the name.

Step 4: Unzip the file and open it. You can find a “ppt” folder in it. Open the “media” folder in “ppt” folder, you will find all the images inserted into PowerPoint.

Friday, October 30, 2009

Change the Color of Hyperlink in PowerPoint 2007

What happens if you are using a blue background in your presentation and you insert a hyperlink? It automatically changes the text color to blue. Now you can’t read your hyperlink because the text and background are almost if not exactly the same color! UGH!

In PowerPoint 2007, it is very easy to change the color of all hyperlinks in your presentation.

1. Go to the Design Tab
2. In the top right of the Themes grouping, click on the Colors down arrow
3. Select Create New Theme Colors located at the bottom of the list
4. Select the desired color for the Hyperlink as well as the Followed Hyperlink

All hyperlinks in your presentation are now changed. Easy and quick!

PowerPoint 2007 Demo: Change the Color of Hyperlink Download Adress:(Offered by Microsoft)

http://download.microsoft.com/download/7/e/5/7e53ac40-e7c7-475c-b77a-0a41c477751f/PP2007DemoChangecolorofhyperlinktext.exe


You may also be interested in:

Burn PowerPoint to DVD Convert PowerPoint to Video

Convert PowerPoint to FLV PowerPoint to Video for Education

PowerPoint to DVD for Education MoyeaConvert PPT to DVD

PowerPoint for Web PowerPoint to PDF PPT to DVD Burner

PowerPoint to Video PowerPoint to DVD Burner

Wednesday, October 14, 2009

Animations Timing for PowerPoint 2007

Most PowerPoint animations are initiated by mouse clicks. However, you can set up PowerPoint animations to activate automatically in a sequence or all at the same time. The first trick to controlling animation timing is to list the effects in the custom animation in the correct order. Effects are added to the list in the order you create them, but you can reorder them by dragging the effects up or down in the Custom Animation task pane.

After you get the effects in the right order, choose an option from the Start drop-down list that’s near the top of the Custom Animation task pane to set the Start setting for each effect. This setting has three options:

  • On Click: Starts the effect when you click the mouse or press Enter

  • With Previous: Starts the effect when the effect above it starts

  • After Previous: Starts the effect when the preceding effect finishes

With your PowerPoint presentation open and the slide you want to animate selected, follow these steps to time animations:


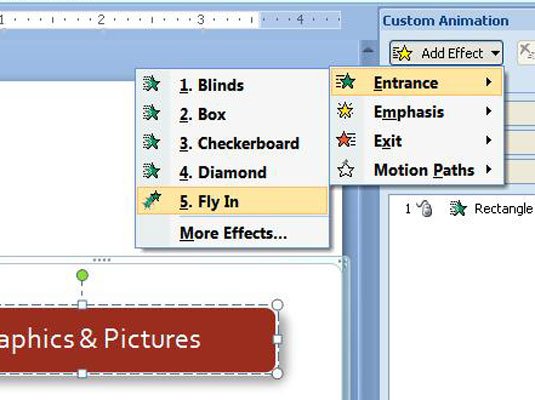
1.Click the Animations tab on the Ribbon and click Custom animations.

The Custom animations task pane opens.


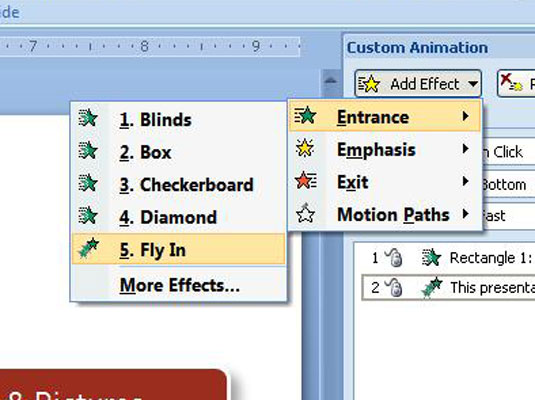
2.Add a Fly-in Entrance effect for the first object.


3.Change the Fly In entrance effect second object.

Monday, September 7, 2009

PowerPoint Tips:Play a Sound Across the Whole PowerPoint Presentation

Summary: Step by step guide on how to play audio file across multiple slides in PowerPoint, make the inserted music continuing play througout the whole PowerPoint slideshow.

What nice music to a slideshow is what sweet birds to a wood. That is why we tend to add an attractive soundtrack to our PowerPoint slides when making a presentation. In actual application, however, you may fail to play a sound continuously over the whole presentation. You may find your soundtrack stop playing when you move onto the next slide as you want it to play across multiple or even all the slides. Hence this essay comes out to give a reasonable description of playing a sound nonstop in PowerPoint.

Since the specific steps are subject to the version of PowerPoint you use and the sort of sounds you want to insert, you must ensure you are using the proper version and your soundtrack is in correct format. We recommend you convert your sound file into the right format using a conversion program if it is not supported by your PowerPoint version. Note that PowerPoint 2000 and upper can support such formats as WAV, MP3, MID, RMI, AIF, AIFC, AU, WMA and AFS. Also note that only *.wav sounds are allowed to embed whatever PowerPoint version you use.

Here we are going to discuss situations in today's most popular versions:
Microsoft Office PowerPoint 2003 and Microsoft Office PowerPoint 2007.

Situation 1 Suppose you are using PowerPoint 2003…
To make a sound continue through multiple or all slides, follow these steps:

  1. Go to the slide where you want to begin your audio track (defaulted as the first slide), and select Insert -> Movies and Sounds -> Sound from File to insert the sound.
  2. After you click OK, you can see a message pop up asking how you want the sound to start in slide shows. Click Automatically.
  3. Select Slide Show ->Custom Animation to enter the Custom Animation pane. Your soundtrack is listed below in the pane.
  4. In the drop-down list of the sound, choose Effect Options. Then the Play Sound interface appears. In the Effect tab, click the radio button beside Stop Playing After XXX slides (which indicates how many slides you want this song to play across) to enter the number of slides you intend to add. For example, you can enter a number from 1 to 999 for this field. Then the sound will play throughout the specified slides.

  5. play sound across slides in powerpoint 2003play sound across slides in powerpoint 2003
  6. Next, check the settings in the Timing tab. To play automatically, you can set to Start After Previous with a 0-second delay. Click OK to exit the dialog box.
  7. Then go to Sound Settings tab, adjust the sound volume as you like. You can also tick to hide sound icon during slideshow if you don't want it appear.
Now you can play the soundtrack from the very beginning to the end of your slideshow.

Situation 2 Suppose you are using PowerPoint 2007…
It is much easier to make a continuous sound since the latest 2007 version is more comprehensive. Now do as follows:

  1. On the slide, click Insert to pick the Sound drop-down list on the very right below the tab. Select Sound from File in the list and choose the specified sound track from your hard drive.
  2. Click OK and a message prompts, saying How do you want the sound to start in the slide show? Click Automatically.
  3. Now click the sound icon to display the Options tab. Click on the tab, and set Play across slides for Play Sound.
  4. play sound across slides in powerpoint 2007
At the moment, it is time for you to play the entire slide show while enjoying this pleasant sound score.
NOTE:
  • The sound you insert must be as long as your slideshow. That is, if the slideshow lasts 5 minutes, your soundtrack should also be at that length. Otherwise, the sound would be cut off until the slideshow ends.
  • It is highly recommend that you take PowerPoint 2007 for your convenience.

Related:

PowerPoint to DVD PowerPoint to Video PowerPoint to FLV

PowerPoint to DVD for Education PowerPoint to Video for Education

PowerPoint for Web PowerPoint to PDF PowerPoint to DVD Burner

Convert PowerPoint to Video PowerPoint to DVD Converter