Banner

Tuesday, August 18, 2009

Back to School idea: Be impressed on others' mind by unique self-introduction

It's time to go back to school again. No matter you are a student or a teacher, you may want to leave a good and deep impression on others at the first day of the new school year, just as we know, the first impression is always the most important, so why not make a unique self-introduction? But how can you achieve a "unique self-introduction", maybe you still have no idea about it, but actually I have one: To Upload Your Self-Introduction PowerPoint Presentation to Youtube! Seems special, doesn't it? So why don't you follow the below steps to make yours?

Follow the below steps:

Step 1: Collect the things you may need:

A: Check whether there is a MS PowerPoint installed on your computer, if not, install one.

Click here to download a free 60-day trail.

B: Look for some related templates, so that you can make your self-introduction easier.

You can find some here.

C:Free download the PowerPoint to Video Converter.

Step 2: Make your self-introduction PowerPoint Presentation with the free templates.

Step 3: Convert your self-introduction slideshow to video formats:

1. Install the PowerPoint to Video Converter.

2. Click the "Add" button to import your Self-Introduction PowerPoint file. This may take a few seconds depending on the size of the file.


3. Specify the parameters of the video and audio settings. Click "Settings" and you will see the following interface:
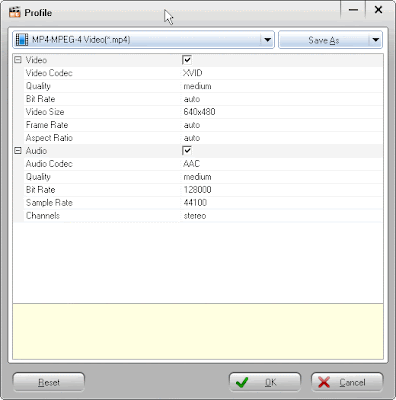


Tips: Youtube only accepts the 4 following video formats: .WMV, .AVI, .MOV, .MPG.


4. Click "Customize" button to set the Timing, Music, Audio, Slide and Conversion options. After your click, the following window will pop up:


5. Click "Start" to begin conversion.


Step 4: Upload the output video to Youtube.

All has been done within such easy steps, then you can make your Self-Introduction just enter the Youtube website without worries about whether a MS PowerPoint was installed in the school computer or there is a different PowerPoint version puzzle. If your students or classmates still didn't catch what you said about yourself after your self-introduction, you can leave the video address to make them learn more.

Seems a good idea? Why not start now?


Related:

PowerPoint to DVD PowerPoint to Video PowerPoint to FLV

PowerPoint to DVD for Education PowerPoint to Video for Education

PowerPoint for Web PowerPoint to PDF PowerPoint to DVD Burner

Convert PowerPoint to Video PowerPoint to DVD Converter

Friday, August 14, 2009

Just for Teachers and Students:Moyea PPT to DVD Burner Edu Edition Released with Low Price


It is time to back to school again,Moyea Software released Edu Edition of her two app with low price,just for giving teachers and students a powerful e-learning tool.

Moyea PPT to DVD Burner Edu Edition
Moyea PPT to DVD Burner Edu Edition is a green E-learning app that creates fantastic DVD and video copies from your PowerPoint content in a few mouse clicks. With catching GUI and dual conversion capacity, the presentation-based education tool makes it easy to build SCORM-compliant DVD or video content that connects with and engages students, teachers, professors, IT professionals, and school administrators across different platforms.

Needless of bothering to any third-party burner, the PPT to DVD and video blend gives you the quickest reach to your back-to-school presentation on a big TV with DVD player, at a mini gadget supportable of video, to an amazing Mac OS without PowerPoint, and throughout the entire Internet hosting videos. Integrate technology to your class and inspire creativity with this ingenious PPT to DVD Edu Edition!


Moyea PPT to Video Converter Edu Edition is a professional tool to shape e-Learning PowerPoint content to video that spans a desktop, a portable and a video-hosting website. The educational edition features a cool verda appearance, yet stays no second to any other of the Moyea PPT to Video Converter family in functionality. Likewise, it can convert a batch of 12 courseware files from PPT to ASF, PPT to AVI, PPT to WMV, PPT to MPEG, PPT to FLV, PPT to MP4, PPT to VOB, PPT to 3GP/3G2, PPT to MOV, PPT to TS, etc.Syncing every subtlety of an eLearning presentation including animations sounds and movie clips successfully to a video output, the PowerPoint-video course creator grants you a full control of your content on the Web (e.g. YouTube, Blogs and Podcasts), and at any portable like iPod and iPhone.


Sunday, August 9, 2009

Five ways to share PowerPoint Presentations with DVD


Again and again, friends from answers.yahoo.com ask me how to burn PowerPoint Presentations onto DVD.

Some of them create compelling PowerPoint slideshows with audio and video clips embedded so that they have no choices but attach the huge packages in the E-mails to send them to others for sharing.

I met a teacher who also had such problems. He had to make a presentation at a place where there is only a DVD Player and a TV without a computer.
So I think it is really necessary to write a comprehensive guide to help you to burn PowerPoint onto DVD for easy distribution and easy sharing.
In this guide five methods will be introduced to help you to convert and save PowerPoint onto DVD.
Method A:Use Windows movie maker to convert PowerPoint to video and then burn it to DVD -Free
Method B:Use PowerPoint to Video Converter to convert
PowerPoint to video and then burn it to DVD -$49.95
Method C:Use PowerPoint to DVD Burner to burn PowerPoint
to DVD directly - $99.95
Method D:Use Camtasia Studio to record PowerPoint as video and then burn it to DVD -$299.95
Method E:Mac users - Export PowerPoint/Keynote file to Quicktime video to burn to DVD -Free

Method A:Use Windows movie maker to convert PowerPoint to video and then burn it to DVD
Step 1. Save your PowerPoint slide show as "PNG" images.
Step 2. Import the pictures to your Windows Movie Maker
Step 3. Select all the imported images and add them to Storyboard
Step 4. Add video effects to the slides (Optional)
Step 5. Save the slide show as a Movie File.

Method B:Use PowerPoint to Video Converter (if a
Bootcamp was installed,it can be also operate on Mac) and then burn it to DVD
Step 1. Insert the PowerPoint files into the converter
Step 2. Set the output options and start to burn
Step 3. Burn the converted video to DVD


Method C: Use PowerPoint to DVD Burner (if a Bootcamp was
installed,it can be also operate on Mac) to burn PowerPoint onto DVD directly
Step 1: Import: You can import up to 12 presentation files at a time.
Step 2: Setting: Check the default settings and make some changes if needed
Step 3. Burn: Click the "Start" button

Method D: Use Camtasia Studio to record PowerPoint as video to burn to DVD
Download: http://www.techsmith.com

Step 1. Set your computer display resolution as 800*600
Step 2. Save your PowerPoint file as PPS files
Step 3. Set Camtasia studio to record the whole screen
Step 4. Play your PowerPoint PPS file and Press "F9" to start recording the screen
Step 5. When you reach your last blank slide, Press F10 to tell Camtasia Recorder to stop recording. You will be prompted to save the captured slideshow, so choose a directory and enter a filename. Click "Save". Camtasia will save your capture as an .AVI file.
Step 6. Then you can burn the video to DVD with Nero or Roxio

Method E: Mac user - Use Quick time to convert PowerPoint to video to then burn it to DVD
Step 1. In Powerpoint, export your presentation as a Quicktime movie "PowerPoint Movie"
If you are using keynote, just export your presentation to Quicktime file directly
Step 2. Burn the Quicktime movie to DVD with your DVD burner.

Advantages and disadvantages
Method A is free but it will lost the transitions and animations in your original PowerPoint.
Method B is cheap and it can retain transitions and animations, but it can't create DVD menus.
Method C has a medium price, it can burn PowerPoint to DVD with DVD Menus and retain the animations, transitions,
sound and movie clips in the original PowerPoint file. (Recommended)
Method D is fairly expensive, but it has lots of other functions such as recording the screen.
Method E is free, but only for Mac users.


Related:

PowerPoint to DVD PowerPoint to Video PowerPoint to FLV

PowerPoint to DVD for Education PowerPoint to Video for Education

PowerPoint for Web PowerPoint to PDF PowerPoint to DVD Burner

Convert PowerPoint to Video PowerPoint to DVD Converter

Wednesday, August 5, 2009

Two Free Methods to Convert PowerPoint to Swf

Converting PowerPoint to Flash would absolutely be a good choice to distribute your bulky PowerPoint Presentation.

You can do the whole PowerPoint-to-Flash conversion manually or with related free software according to the following two methods:

Method I:

If you don’t have Flash you might need a free program called MotionSWF and PowerPoint although you don’t even need PowerPoint as any presentation app that outputs the presentation as a series of .jpg or .png slides will work.

1. Inside PowerPoint Export as a JPG by opening the presentation then hitting File&gtSave as (Pick JPEG) and when it asks to export every frame say yes. PPT will then create a new folder with each slide as a JPG. Note Flash does not import WMF correctly. The only tool I have found outside of those made by MS, who created the format, that does is WMF Companion. Exporting as a WMF sequence from PPT and then re-importing will seriously mess up your work in many situations (mostly with text). If you did not use any text you may want to export as WMF as they will scale while a raster output tends to pixilate when scaled.

2. Now you have only had to click import and choose Slide1 and then Flash will ask you if you want to import all the Images as a Sequence. All your slides are now in Flash. Alternatively if you own Flash MX you could turn your Image Sequence into an AVI and import it as Video.

3. If you do not own Flash 5/MX and do not have an app that can import a sequence then a very simple piece of freeware can convert any Image Sequence into a SWF called Motion SWF is available http://ra.sakura.ne.jp/~taos/moswf/ You will need a SWF Authoring tool that either supports AS (KM, 3DFA, LM2) or Tell Target (SWiSH) to stop and start each frame in your animation if desirable. Likewise if your app will import SWF then you could just import the SWF.

4. In order to use Motion SWF open it and drag the created slide folder into the application. Click the movie button and you can set the frame speed. If you set Frames to 1 your presentation will play at 1 FPS, which is suitable for many slideshows.

But if you want your PPT Text effects preserved this will not work.

Method II:

First, you'll need to prepare the PowerPoint files. Make sure you are not using any complicated gradients or animations. These will be interpreted poorly when they are brought into Flash. Also, make sure there are no objects that fall outside the confines of the slide area. This will ensure that all the slides align correctly when they are imported to Flash. Now, save a copy of your presentation without any background images. You may want to also choose a contrasting background color to easily see the content of each slide. You all import the background images into Flash at a later time.

Second, choose File > Save As... from your PowerPoint document and save the presentation as a Windows Metafile (*.wmf). This will save your entire presentation as a sequence of files. WMF files keep all text.

Next, create a new Flash Document and resize the Stage to 720 x 540. Change the background color to black. Choose File > Import > Import to Stage... and import the first WMF file. When asked to import all of the images in the sequence, choose Yes. This will place each slide from your presentation onto a sequence of frames.

Then, create a new layer under the slides layer and import the images to use for your background. You'll probably need two images, one for title slides and one for the regular slides.

Now it's time for some manual labor. You'll need to go through every frame of the movie and delete the solid background shape from your slides layer. Once this is complete, you should see the content of each slide with the correct background image behind it.

Finally, add a frame to the end of your movie. Place some static text on that frame that says something like "End of slideshow, click to exit."

Alright, now it's time to move on to some ActionScript. Create a new layer for your actions. There are a few statements you'll need to include right away.
First, you want this movie to play full screen so add an fscommand.
fscommand("fullscreen","true")-;
To make sure the Stage resizes correctly specify the scaleMode.
Stage.scaleMode = "exactFit";
Finally, you don't want the movie to begin playing through all the slides right away before the user starts clicking, so add a stop function.
stop();
You'll need to include some functions that will be used frequently to navigate the presentation.
function gotoNextSlide():Void {
if (_currentframe <>Next, we need to handle all the keyboard and mouse events so that the user can navigate through the slides. We'll do this by creating a new listener object.
var myListener:Object = new Object();
myListener.onKeyDown = myOnKeyDown;
myListener.onKeyUp = myOnKeyUp;
Key.addListener(myListener);
myListener.onMouseUp = myOnMouseUp;
Mouse.addListener(myListener);-Here are the listener functions.
function myOnKeyDown():Void {
if (Key.isDown(Key.DOWN) || Key.isDown(Key.PGDN)) {
gotoNextSlide();
} else if (Key.isDown(Key.UP) || Key.isDown(Key.PGUP)) {
gotoPreviousSlide();
} else if (Key.isDown(Key.END)) {
gotoEnd();
} else if (Key.isDown(Key.HOME)) {
gotoHome();
}
}

function myOnKeyUp():Void {
if (Key.getCode() == 27) {
quit();
}
}
function myOnMouseUp():Void {
gotoNextSlide();
}
zoundryIf the steps below is too complicated to you, you can try some PowerPoint to Flash converters. Some free office applications like OpenOffice (http://www.openoffice.org) offers the output as SWF file, but without animations and effects.

Which one do you prefer? That's your choice!

Now,on the web free PowerPoint to SWF converter can also be found,such as authorPOINTTM Lite Free PowerPoint to Flash Converter for PPS, PPT to SWF

Download the files used in the method I.
Download (1146 kb)
Get conversion and unzipping tools for PC and Mac here!

Related:

PowerPoint to DVD PowerPoint to Video PowerPoint to FLV

PowerPoint to DVD for Education PowerPoint to Video for Education

PowerPoint for Web PowerPoint to PDF PowerPoint to DVD Burner

Convert PowerPoint to Video PowerPoint to DVD Converter

Sunday, August 2, 2009

Are you ready to go balck to school?--To Students and Parents

It is time to go back to shool again,did you get everything ready for your new school life?
Here is a checklist for your reference:

Back To School Checklist


Clothing

5 pairs pants or skirts (min)

5 Mix and Match tops (min)

Socks or tights

Under garments

Sweater, sweat jacket

Rain Coat

Winter Coat

Sneakers

Shoes

Winter Boots

Snow pants


School Supplies

Pencils

Pens

Erasers

Markers

Crayons

Highlighters

Paper

Notebooks

Scissors

Glue

Glue Sticks

Pencil Case

Pencil Sharpener

Book bag - backpack

Ruler

Compass

Calculator

Planner or Organizer

Dictionary

Thesaurus

PowerPoint to Video Tool

MS Office


Food Supplies

Lunch box or bags

Sandwich bags

Sandwich Makings

Individual Size Chips

Desert

Fruit

Drink

Breakfast

After School Snacks


Related:

PowerPoint to DVD PowerPoint to Video PowerPoint to FLV

PowerPoint to DVD for Education PowerPoint to Video for Education

PowerPoint for Web PowerPoint to PDF PowerPoint to DVD Burner

Convert PowerPoint to Video PowerPoint to DVD Converter