You must take a lot of memorable photographs during Christmas and store them on computer. It's a wise idea for you to organize them in a good way. Make them a DVD photo album is a nice solution. It is quite an easy job as long as you have Microsoft PowerPoint installed on your computer.
PowerPoint versions 2000 to 2007 have the feature to save your photos as an album. Make separate digital photo albums for different sets of pictures. There is no limit to the number of albums, or the number of photos in each album. So you can add all the pictures of the same set into one album. This is a great way to organize your photo life.
Now let's start to create an awesome album using PowerPoint 2007.Add pictures into the album
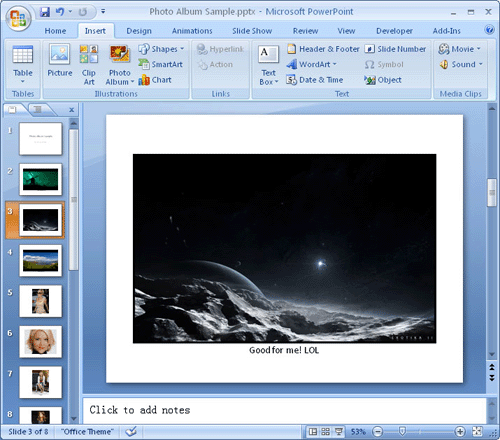
On the Insert menu, point to Picture, and then click Photo Album.

Click on the 'File/Disk…' option and locate the pictures on the computer. You can add multiple pictures at one time. It is strongly recommended that you optimize the pictures in Photoshop/gimp before inserting them into the album. Because pictures are used a high but unnecessary resolution, i.e. 3 million, you can downgrade the photo resolution into 800x600, which is 480,000.

Choose an album layout
- In the Album Layout section at the bottom of the dialog box, choose a layout for the pictures on each slide. You can also reorder the sequence of the pictures using the up and down arrow keys below the listing of the pictures, rotate the pictures, and adjust the brightness and saturation. A layout preview is shown on the right side of the dialog box.
- And, you are provided with an option to use customized template. Click the Browse button. Locate the template in the 'Choose Design Template box' that allows you to navigate to the folder where we have stored the downloaded templates. Choose any of the three templates.
- Finally, click on 'Create' button, done. Isn't this easy?

Burn the PowerPoint album to DVD
- Capture the screen to make a regular video file using Camstudio (http://camstudio.org), it is totally free. It will save your video in AVI format. You just need to burn the video to DVD using Nero/Roxio.
- You can use PowerPoint to DVD Burner from Moyea Software. It can save PPT files onto DVD and enable you watch it on TV. This mothod is much more convenient.
There are also some good tips for you all:
- Choose different layouts for different pictures. Big landscape pictures deserve a whole slide, while other pictures may share a single slide.
- Beautiful PowerPoint template can make your album shining.
- Add text titles and descriptions for some pictures, photos cannot tell everything.
- Take care of the DVD photo album disc.
Related:
![]() PowerPoint to DVD for Education
PowerPoint to DVD for Education ![]() PowerPoint to Video for Education
PowerPoint to Video for Education
 PowerPoint for Web
  PowerPoint to PDF
 ![]() PowerPoint to DVD Burner
PowerPoint to DVD Burner

No comments:
Post a Comment